Observer Mode
Using RevenueCat without changing existing purchase code
Observer Mode enables you to migrate your existing subscribers to RevenueCat while retaining your existing code for fetching products, making purchases, and checking subscription status. This allows you to access to the advanced charting, webhooks, and integrations that RevenueCat provides as quickly as possible and with minimal engineering effort.
Observer Mode may be set up as part of your migration strategy to RevenueCat, or as a permanent solution. Use the table below to compare what features become available with Observer Mode vs. a full RevenueCat SDK integration.
| Feature | Observer Mode | Full Integration |
|---|---|---|
| Charts | ✅ * | ✅ |
| Webhooks & Integrations | ✅ | ✅ |
| Data Exports | ✅ | ✅ |
| Customer Lists | ✅ * | ✅ |
| Experiments | ❌ | ✅ |
| Fetching Products | ❌ | ✅ |
| Making Purchases | ❌ | ✅ |
| Checking Subscription Status | ❌ ** | ✅ |
*information based around the "last seen time" and "country" may not be complete in Observer Mode
**subscription status will be correct for your customers in Observer Mode, but we strongly recommend a full integration if planning to use RevenueCat as your subscription source-of-truth
Implementation
Observer Mode can be implemented server-side via REST APIs or client-side through the RevenueCat SDK. You should only implement Observer Mode one way or the other.
Option 1: Server-side
| Pros | Cons |
|---|---|
| ✅ No client-side code changes | ❌ The "last seen" attribute will be missing from customers since they are never "seen" by the client |
| ✅ Captures purchases from any app version | ❌ The "country" attribute will be missing from customers and transactions since it is computed from the customer's device IP address |
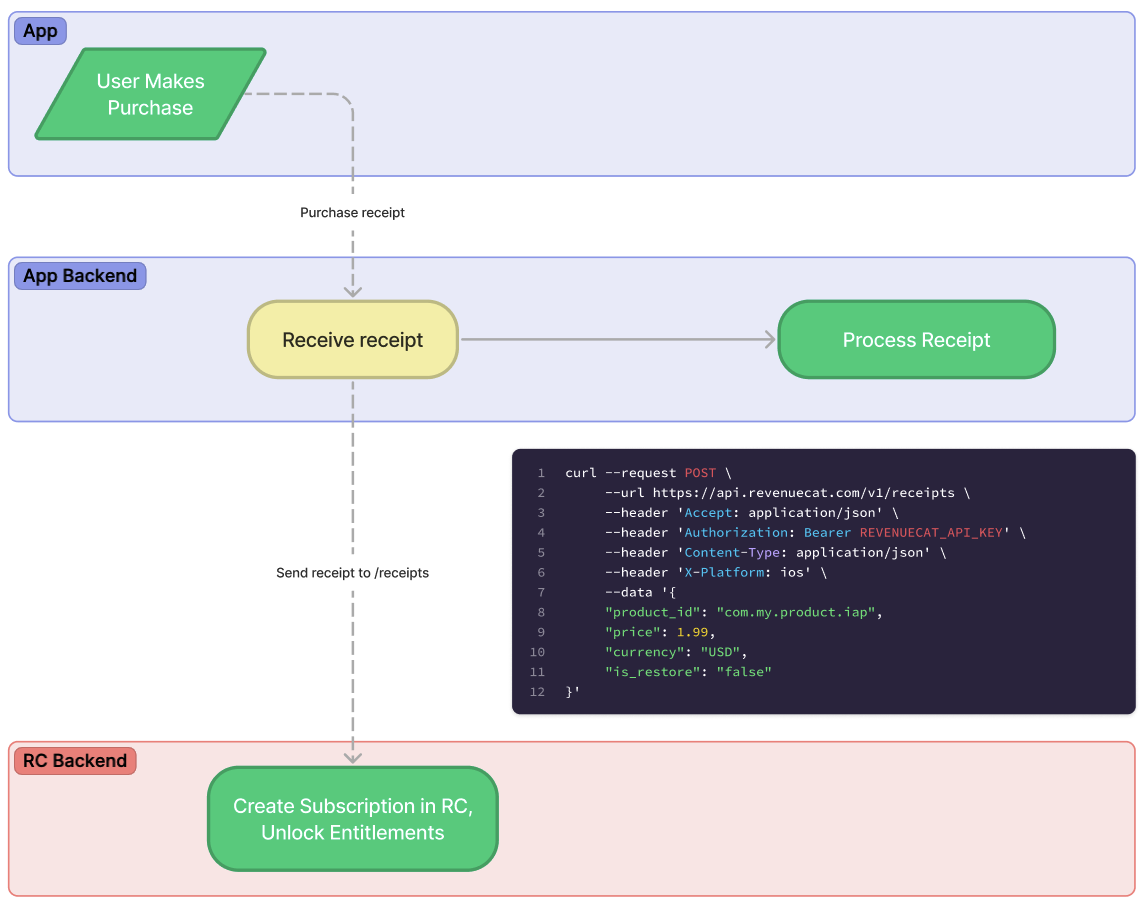
If you're already sending receipts to your server, you can enable Observer Mode by forwarding the receipts along to RevenueCat then processing them as you normally do.
With this option, you should already have a process in place for validating receipts on your server. When you receive a receipt, you can forward it to RevenueCat via the POST /receipts endpoint then have your server continue doing whatever it is already.
Don't worry about validating the receipt before forwarding to RevenueCat - we always validate receipts with the stores before saving them.

Requirements
The requirements for server-side Observer Mode are the same as those for the POST /receipts endpoint. This includes:
app_user_idfetch_tokenpricecurrencyproduct_id
While price, currency, and product_id are not required parameters for the API, they're highly recommended for Observer Mode to get value out of the integration - without providing this info RevenueCat will not have any price information.
If you're not already sending price and currency to your server there are two options:
- Update your client-side code to start sending price and currency to your server. However, at this point a client-side Observer Mode setup may be simpler.
- Hardcode a mapping of product IDs to their corresponding USD currency on your server. While this system isn't perfect as it won't account for country specific pricing and currency conversion rates, it may be a suitable approximation.
Complete Apple base64 receipt file required
Observer Mode requires the raw base64 encoded Apple receipt as the
fetch_token. Partial receipts or the receipt information from the Apple server-to-server notifications is insufficient.
Past subscription history will not be imported for Google and Stripe subscriptions
Due to limitations in both Google’s and Stripe’s subscription APIs, RevenueCat will not have access to the full past history of your subscription data. This means that metrics such as revenue may not be accurate for past periods. However, data will fill in from the point of migration into the future.
Option 2: Client-side
| Pros | Cons |
|---|---|
| ✅ No server-side code changes | ❌ Only captures purchases from latest app version |
If you're not saving receipts already on your server, or have limited backend resources available, a client-side Observer Mode implementation is often the best path. Implementation is no more than a couple lines
Requirements
Android
Google Play Billing Library: 2.0+ (Android only)
iOS
No special requirements
Amazon
No special requirements
1. Configure the SDK
Purchases.logLevel = .debug
Purchases.configure(
    with: Configuration.Builder(withAPIKey: Constants.apiKey)
        .with(observerMode: true)
        // Optionally set an app user ID for the user
        .with(appUserID: UserManager.appUserID)
        .build()
)
RCPurchases.logLevel = RCLogLevelDebug;
RCConfigurationBuilder *configuration = [RCConfiguration builderWithAPIKey:@<public_sdk_key>];
configuration = [configuration withObserverMode:YES];
configuration = [configuration withAppUserID:@<app_user_id>];
[RCPurchases configureWithConfiguration:[configuration build]];
// If you're targeting only Google Play Store
class MainApplicationOnlyPlayStoreObserverMode : Application() {
    override fun onCreate() {
        super.onCreate()

        Purchases.logLevel = LogLevel.DEBUG
        val builder = PurchasesConfiguration.Builder(this, Constants.googleApiKey)
            .observerMode(true)
            // Optionally set an app user ID for the user
            .appUserID(UserManager.appUserID)
        Purchases.configure(builder.build())
    }
}
class MainApplication : Application() {
    override fun onCreate() {
        super.onCreate()
        Purchases.logLevel = LogLevel.DEBUG

        // If you're building for the Amazon Appstore, you can use flavors to determine
        // which keys to use.
        //
        // Add the following to your build.gradle to create a flavor dimension called "store":
        //
        // flavorDimensions "store"
        // productFlavors {
        //     amazon {
        //         buildConfigField "String", "STORE", "\"amazon\""
        //     }
        //
        //     google {
        //         buildConfigField "String", "STORE", "\"google\""
        //     }
        // }
        if (BuildConfig.STORE == "amazon") {
            val builder = AmazonConfiguration.Builder(this, Constants.amazonApiKey)
                .observerMode(true)
                // Optionally set an app user ID for the user
                .appUserID(UserManager.appUserID)
            Purchases.configure(builder.build())
        } else if (BuildConfig.STORE == "google") {
            val builder = PurchasesConfiguration.Builder(this, Constants.googleApiKey)
                .observerMode(true)
                // Optionally set an app user ID for the user
                .appUserID(UserManager.appUserID)
            Purchases.configure(builder.build())
        }
    }
}
// If you're targeting only Google Play Store
public class MainApplication extends Application {
    @Override
    public void onCreate() {
        super.onCreate();
        Purchases.setLogLevel(LogLevel.DEBUG);
        Purchases.configure(new PurchasesConfiguration.Builder(this, <public_google_sdk_key>).observerMode(true).build());
    }
}

// If you're building for the Amazon Appstore,
// click the Kotlin tab to see how to set up flavors in your build.gradle:
///...

public class MainApplication extends Application {
    @Override
    public void onCreate() {
        super.onCreate();
        Purchases.setLogLevel(LogLevel.DEBUG);

        PurchasesConfiguration.Builder builder = null;

        if (BuildConfig.STORE.equals("amazon")) {
            builder = new AmazonConfiguration.Builder(this, <public_amazon_sdk_key>);
        } else if (BuildConfig.STORE.equals("google")) {
            builder = new PurchasesConfiguration.Builder(this, <public_google_sdk_key>);
        }

        Purchases.configure(builder.observerMode(true).build());
    }
}
await Purchases.configure(
    PurchasesConfiguration(<public_sdk_key>)
      ..observerMode = true
);
// Observer mode can be configured through the Unity Editor.
// If you'd like to do it programmatically instead,
// make sure to check "Use runtime setup" in the Unity Editor, and then:

Purchases.PurchasesConfiguration.Builder builder = Purchases.PurchasesConfiguration.Builder.Init(<api_key>);
Purchases.PurchasesConfiguration purchasesConfiguration =
    builder.SetUserDefaultsSuiteName("user_default")
    .SetObserverMode(true)
    .SetAppUserId(appUserId)
    .Build();
purchases.Configure(purchasesConfiguration);
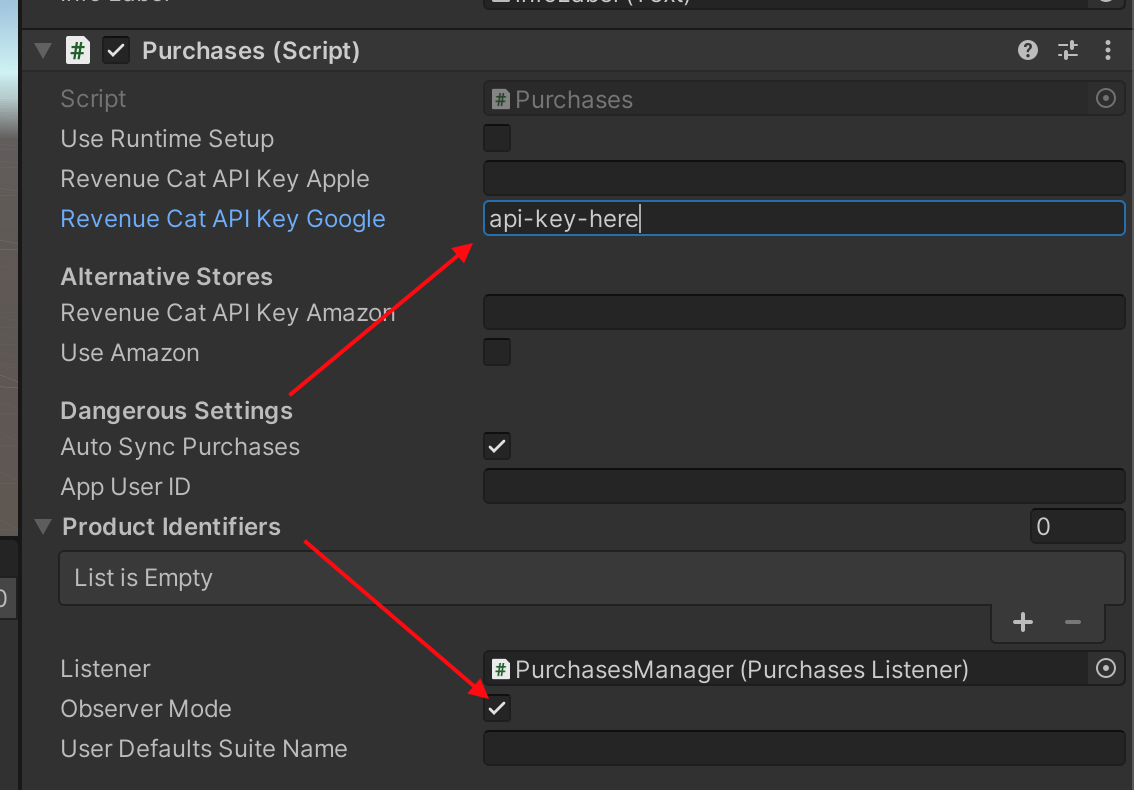
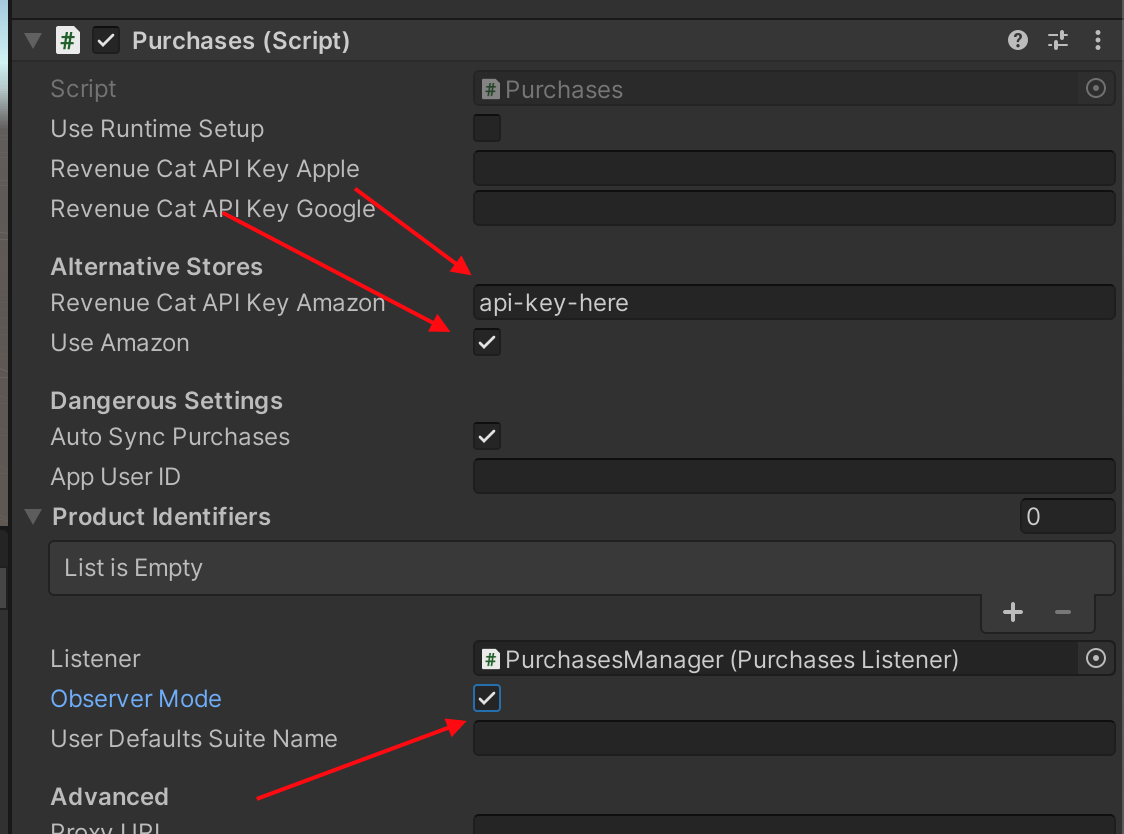
Enable Observer Mode in Unity Editor (Unity Only)
For Google Play (can also be done programmatically, see Configuration section)

For Amazon Store (can also be done programmatically, see Configuration section)

Important note regarding InAppBillingService (Android Unity only)
If using RevenueCat alongside Unity IAP or other plugin that includes the Android InAppBillingService class, follow these instructions
Important (Android only)
On Android, RevenueCat will not consume or acknowledge any purchase in Observer Mode so be sure your app is handling that. Failure to do so will result in your purchases being refunded after 3 days.
2. Sync purchases with RevenueCat (Amazon Store only)
On Android with Amazon Store (including cross-platform SDKs running on Android), any time a purchase or restore occurs in your app you should call the syncObserverModeAmazonPurchase method to record it in RevenueCat. Failure to do so will result in no purchases being recorded.
public void OnInitialized(IStoreController controller, IExtensionProvider extensions)
{
   m_StoreController = controller;
   storeExtensionProvider = extensions;
   var purchases = GetComponent<Purchases>();
   purchases.SetDebugLogsEnabled(true);
   foreach (Product product in controller.products.all)
   {
       if (product.hasReceipt) {
           var amazonExtensions = storeExtensionProvider.GetExtension<IAmazonExtensions>();
           var userId = amazonExtensions.amazonUserId;
           purchases.SyncObserverModeAmazonPurchase(
               product.definition.id,
               product.transactionID,
               userId,
               product.metadata.isoCurrencyCode,
               Decimal.ToDouble(product.metadata.localizedPrice)
           );
       }
   }
}

public PurchaseProcessingResult ProcessPurchase(PurchaseEventArgs e)
{
   var purchases = GetComponent<Purchases>();

   var amazonExtensions = storeExtensionProvider.GetExtension<IAmazonExtensions>();
   var userId = amazonExtensions.amazonUserId;
   purchases.SyncObserverModeAmazonPurchase(
       e.purchasedProduct.definition.id,
       e.purchasedProduct.transactionID,
       userId,
       e.purchasedProduct.metadata.isoCurrencyCode,
       Decimal.ToDouble(e.purchasedProduct.metadata.localizedPrice)
   );
   return PurchaseProcessingResult.Complete;
}
Purchases.sharedInstance.syncObserverModeAmazonPurchase(
  receipt.termSku,
  receipt.receiptId,
  userData.userId,
  isoCurrencyCode,
  storeProduct.price
)
Configuring Integrations
Certain integrations, such as most of the Attribution Integrations, require some device data to work properly. Observer Mode does not automatically collect any device data.
If you plan on using an integration that requires device data with Observer Mode, you'll need to integrate the RevenueCat SDK to collect the data or set the appropriate attributes via the REST API. Note that attributes can be passed as an object in the POST /receipts endpoint as well if you're doing a server-side Observer Mode implementation.
Next Steps
- With Observer Mode up-and-running capturing new purchases, you may want to migrate existing purchases to RevenueCat as well
Updated 7 days ago
